
Your house wall isn't just a boundary; it's the most reliable foundation for a luxury outdoor retreat. Many homeowners hesitate to drill into their masonry because they worry about damaging brickwork or compromising modern insulation. It's a natural concern when you're aiming for a professional finish that stands the test of time. Learning how to install a wall mounted pergola is actually about precision and confidence rather than complex engineering. You've likely dreamed of a seamless transition where your living room flows directly into a sheltered, high-end terrace, and we're here to show you that this architectural transformation is entirely within your reach.
We've designed this guide to help you master the art of installing a wall-mounted aluminium pergola with a comprehensive, step-by-step approach. You'll discover how to navigate 2026 UK planning regulations, ensure perfect water drainage, and achieve a rock-solid seal against your home. We'll walk through everything from the initial measurements to the final touches like integrated LED lighting and wind blinds. This guide provides the technical clarity and reassurance you need to create a secure, sophisticated structure that adds immediate value to your property and your lifestyle.
Key Takeaways
- Learn how to identify load-bearing walls and select the specific fixings required for solid brick or cavity walls to ensure a secure, permanent structural connection.
- Follow our precision-led process on how to install a wall mounted pergola, covering everything from marking the perfect height to securing the wall plate with surgical accuracy.
- Navigate UK planning regulations with confidence by understanding Permitted Development height limits and boundary restrictions for a stress-free, compliant transformation.
- Discover how to integrate wind blinds and LED lighting kits during the assembly phase to create a sophisticated, year-round outdoor living room that increases property value.
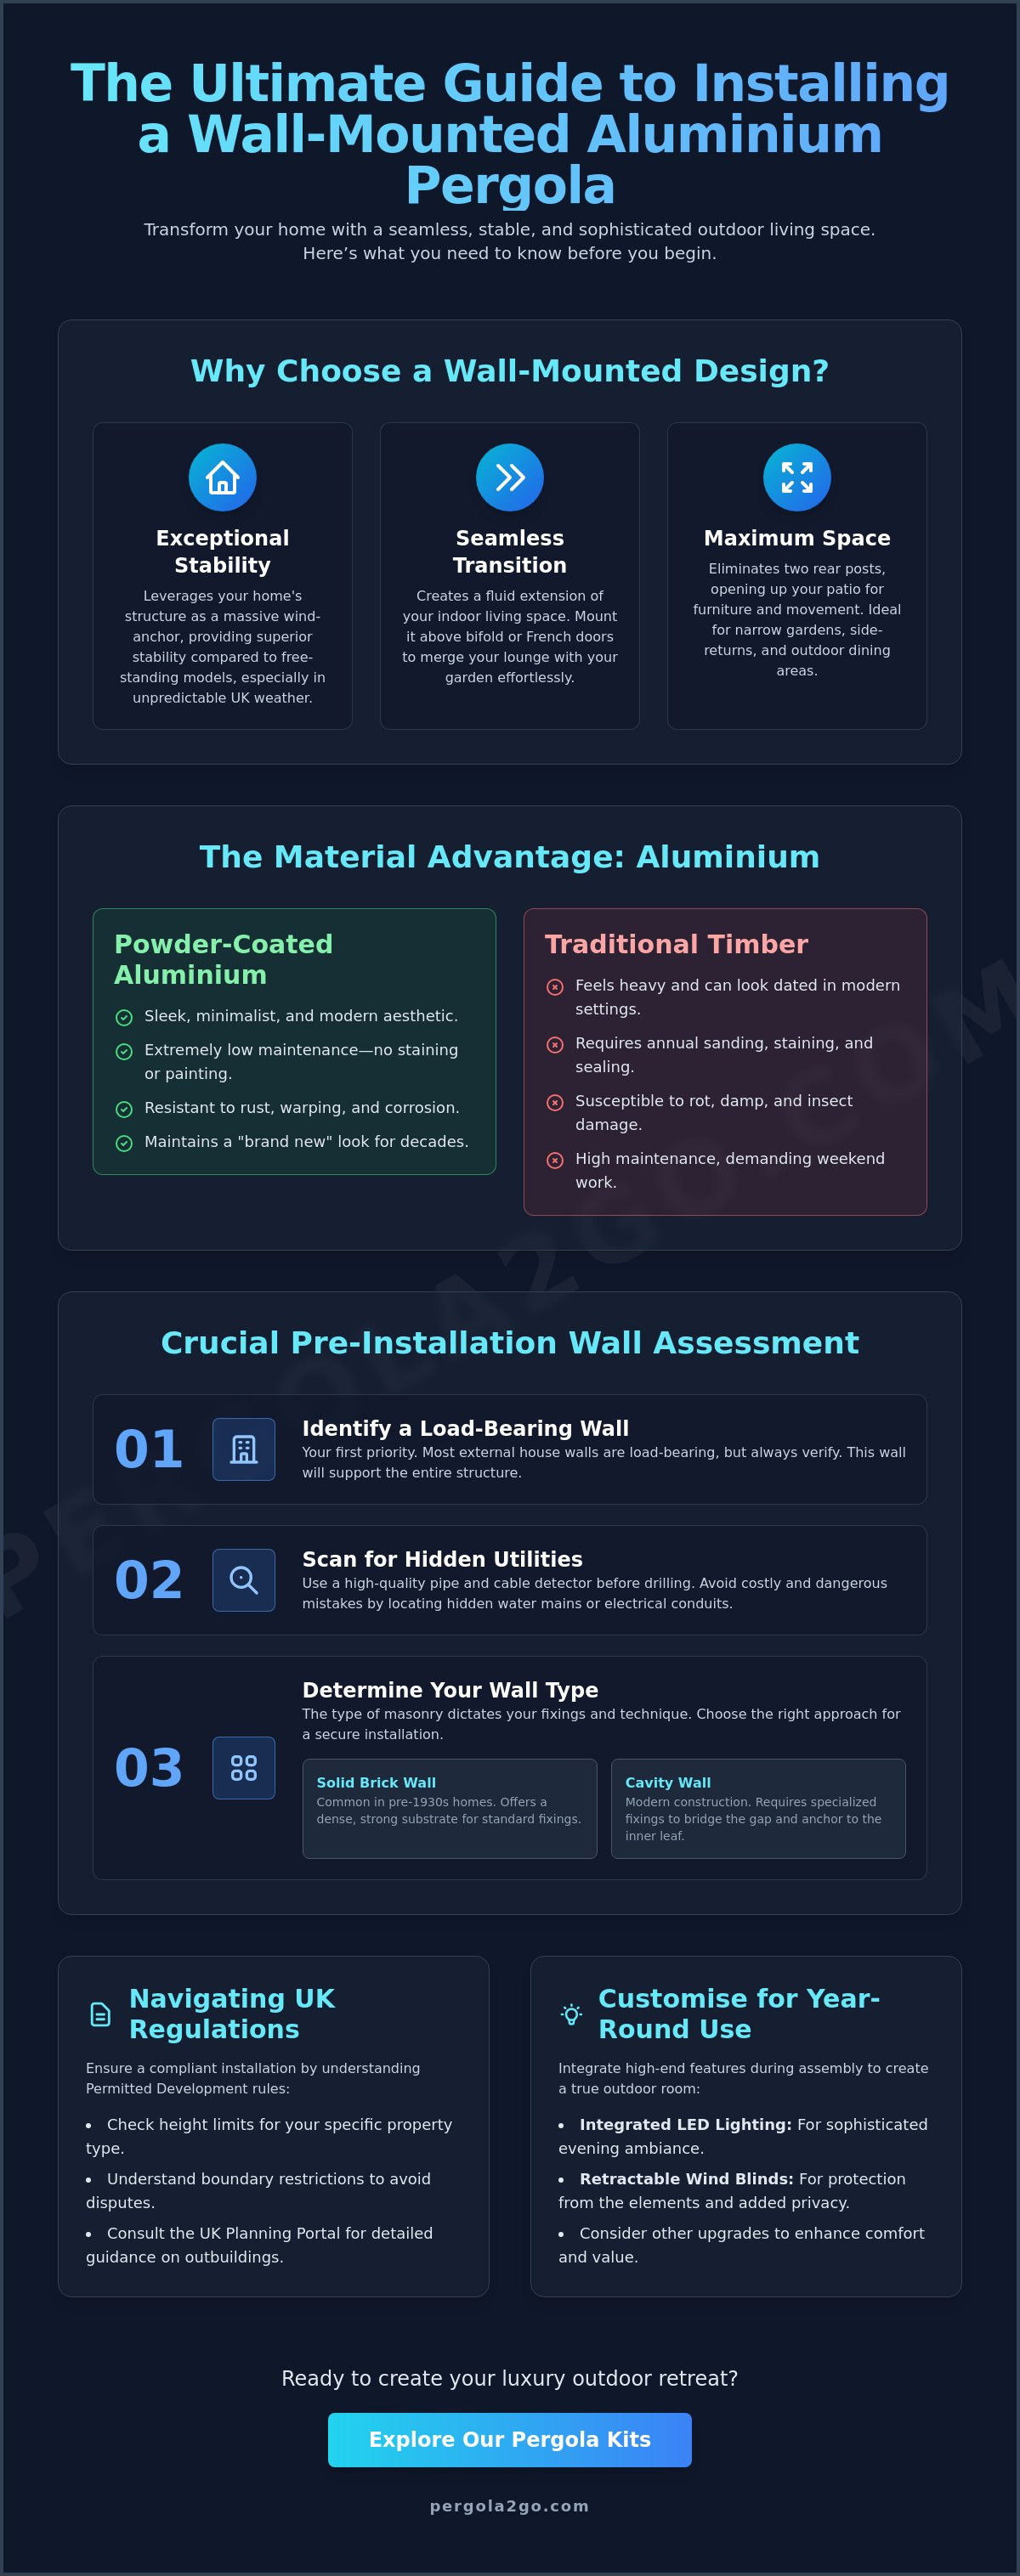
Why Choose a Wall-Mounted Aluminium Pergola?
A wall-mounted pergola, often called a lean-to, is a sophisticated architectural extension where one side of the structure is secured directly to your home's masonry. This configuration creates a permanent, rock-solid connection that turns your house into the ultimate support system. Unlike free-standing models that rely entirely on their own posts, a wall-mounted design uses your property as a massive wind-anchor. This provides exceptional stability, especially during the unpredictable storms often seen across the UK. Understanding What is a Pergola? helps illustrate how these structures have evolved from simple garden features into high-performance living spaces that bridge the gap between indoors and out.
Before you dive into the technical details of how to install a wall mounted pergola, it's vital to recognize the lifestyle shift it offers. You aren't just adding a shelter; you're creating a seamless transition. By mounting the frame directly above your bifold or French doors, you extend your floor plan into the garden. It eliminates the awkward "no man's land" between the back door and the patio, making your outdoor area feel like a natural, high-end extension of your lounge or kitchen.
The Aesthetic Advantage of Aluminium
Modern British architecture demands materials that match its clean, minimalist lines. While traditional timber has its charm, it often feels heavy and requires constant attention to prevent the inevitable British damp from causing rot. Powder-coated aluminium is the superior alternative for the discerning homeowner. It offers a sleek, industrial elegance that stays looking brand new for decades. You won't have to worry about the annual chore of staining, sanding, or painting. Our aluminium frames are engineered to resist warping and rust, providing a low-maintenance solution that lets you spend your weekends relaxing rather than maintaining your structures.
Maximising Your Patio Footprint
Space is a premium in many UK gardens, particularly in urban terraces or modern new-builds with narrow side-returns. A wall-mounted pergola is a masterclass in space efficiency. By removing the two rear posts that would otherwise clutter your walkway, you open up the entire patio area for furniture and movement. This "floating" effect is perfect for:
- Narrow Gardens: Creating a sheltered zone without blocking the flow of a slim outdoor space.
- Outdoor Dining: Fitting a full-sized dining table right up against the house wall for easy serving.
- Side Returns: Transforming often-wasted strips of land into functional, dry storage or seating areas.
This post-less design doesn't just save physical inches; it creates a visual sense of openness. It makes a small garden feel significantly larger by drawing the eye upward and outward, cementing the "room extension" effect that modern homeowners crave. It’s an investment in both your property's footprint and its overall market value.
Assessing Your Wall and Choosing the Right Fixings
A wall-mounted structure is only as strong as the masonry it grips. Before you lift a single component, you must evaluate the structural integrity of your home's exterior. Identifying a load-bearing wall is your first priority. While most external house walls in the UK are load-bearing, you should always verify the path of internal utilities. Use a high-quality pipe and cable detector to ensure you aren't drilling into water mains or electrical conduits hidden behind the brickwork. It's also the right time to consult the UK Planning Permission for Outbuildings guidelines to confirm your chosen wall location aligns with local regulations.
The type of brickwork dictates your entire technical approach. Solid brick walls, common in pre-1930s properties, offer a dense substrate for fixings. Modern cavity walls require more care. You need to bridge the gap between the outer leaf and the inner structure without crushing the internal insulation. If your home features a timber frame, you must locate the internal studs; bolting into just the cladding or brick skin won't provide the necessary support. The wall plate acts as the backbone of your installation. It distributes the weight of the aluminium frame across multiple points, preventing localized stress on any single brick. Mastering how to install a wall mounted pergola starts with this crucial assessment phase. To get this right, you'll need an SDS drill for the heavy lifting, a long spirit level for absolute horizontal accuracy, and a torque wrench to tighten fixings to the manufacturer's exact specifications.
Masonry and Render Considerations
Modern homes often feature External Wall Insulation (EWI) or decorative render. Drilling through these requires a delicate touch. Use sharp masonry bits and avoid the "hammer" setting on your drill until you've cleared the render layer to prevent spalling or cracking. If your wall is textured or uneven, you might need spacers to ensure the wall plate sits perfectly flush. This attention to detail ensures a professional-grade finish that looks like it was part of the original build. When you're ready to start your project, choosing a high-quality wall mounted pergola ensures the engineering matches your home's integrity.
Selecting Your Anchors
For most modern UK homes, stainless steel expansion bolts are the standard choice. They provide immediate, mechanical grip. However, if you're working with older, softer bricks, chemical resin anchors are superior. The resin seeps into the pores of the brick, creating a bonded connection that won't crack the substrate. Always opt for A4-grade stainless steel to prevent rust streaks from marring your facade. Choosing the right hardware is the secret to a structure that withstands high UK wind zones. You want a fixing that offers a high safety margin, ensuring your new outdoor room remains secure regardless of the weather.
Step-by-Step: Installing Your Wall-Mounted Pergola Kit
Precision is the hallmark of a professional-grade installation. Before lifting the heavy aluminium beams, you must establish a baseline that ensures both aesthetic symmetry and functional drainage. Start by marking the height of your wall plate. You'll need to account for a minimum head clearance of 2.1 metres, while also ensuring the louvers have enough room to rotate fully without hitting eaves or light fixings. A laser level is your best friend here; it projects a perfectly horizontal line across the masonry, eliminating the guesswork that often leads to slanted structures. Mastering how to install a wall mounted pergola requires this initial focus on geometry to ensure the rest of the assembly clicks into place with ease.
The Critical First Fix: The Wall Plate
Modern aluminium ledger plates are designed for high-load performance, but they require surgical accuracy during the "first fix." We recommend a "dry fit" method. Hold the plate against your marked line and use a pencil to transfer the pre-drilled hole locations to the brickwork. Remove the plate before drilling to ensure you aren't fighting the weight of the metal. Before final mounting, apply a generous bead of high-grade silicone sealant in a "U" shape behind each bolt hole on the plate. This creates a watertight gasket, preventing moisture from seeping into your drill holes and causing damp issues later. When tightening, follow a staggered sequence from the center outwards. This avoids putting uneven stress on individual bricks and ensures the plate sits perfectly flush against the facade. Adhering to DIY and Building Product Safety Regulations ensures that your structural connections meet the necessary standards for home improvement projects.
Aligning the Frame and Posts
Once the wall plate is secure, it's time to build out. Connect the primary side beams to the wall plate, supporting the outer ends with your front posts. To ensure the structure is perfectly square, use the "3-4-5 triangle" method. Measure 3 feet along the wall and 4 feet along the side beam; the diagonal distance between those two points must be exactly 5 feet. If it isn't, nudge your front posts until the math aligns. Most UK gardens have a slight slope for drainage, so you might find one post needs to sit slightly higher than the other. Our kits allow for this fine-tuning, ensuring the roof remains level even if the patio isn't. Secure the post feet into your concrete pads or solid stone slabs using the provided heavy-duty anchors for a rock-solid foundation.
Completing the Louvered Roof
The louvered roof system is where engineering meets luxury. Carefully slot each louver into the drive mechanism, ensuring they all sit in the same orientation. Once the blades are in, test the manual or motorized crank. The movement should be silent and effortless. This is also the moment to verify your drainage. Pour a bucket of water onto the closed roof and watch how it flows into the internal guttering system and down through the integrated post outlets. Finish the project with a final torque check on every structural bolt. This ensures the entire system acts as a single, rigid unit capable of defying the strongest British gales.
Navigating Planning Permission and Safety Regulations
Achieving a professional-grade transformation requires staying on the right side of UK law. Most wall-mounted structures fall under Permitted Development rights. This means you can usually bypass the headache of a full planning application. However, precision is key. If your structure sits within two metres of your property boundary, the maximum height is strictly 2.5 metres. If it's further away, you can go up to 3 metres for a flat roof. Understanding these limits before you learn how to install a wall mounted pergola prevents costly enforced removals later. You should also ensure the total area of all outbuildings doesn't exceed 50% of the land around your original house.
A pergola isn't a habitable room. Because of this, it generally doesn't trigger full Building Regulations. However, any electrical additions like an LED lighting kit or infrared heaters must be installed by a qualified electrician to remain compliant. If you want absolute peace of mind, especially for future property valuations, consider applying for a Lawful Development Certificate from your local authority. It's a formal document confirming your project was legal from day one, providing a paper trail that simplifies things when you eventually sell your home.
UK Planning Myths Debunked
Don't let the "temporary" versus "permanent" debate confuse you. Planning authorities focus on the physical impact on the land rather than whether a structure can be unbolted. While garden pergolas are designed for ease of assembly, they're treated as permanent additions in the eyes of the law. If you live in a Conservation Area, an Area of Outstanding Natural Beauty, or a Listed Building, the rules tighten significantly. Always check with your local planning officer in these cases to ensure your luxury upgrade doesn't meet unexpected red tape. Secure your investment by choosing from our range of compliant wall mounted pergola kits today.
Drainage and Damp Proofing
Protecting your home's envelope is just as important as the structure itself. When you mount a ledger plate, ensure it doesn't bridge your house's Damp Proof Course (DPC). This usually sits at least 150mm above ground level. Mounting too low can lead to moisture bridging, which causes rising damp inside your lounge or kitchen. You must also manage rainwater runoff with precision. Our integrated guttering systems channel water away from the masonry, but adding a dedicated sealant strip or lead flashing along the top edge of the wall plate provides a 100% watertight seal. This prevents pooling against your bricks and keeps your transition zone bone-dry during the heaviest British downpours. Mastering how to install a wall mounted pergola means thinking about these long-term structural health factors from the very first bolt.
Customising Your Wall-Mounted Space for Year-Round Use
Your structure is now secure, but the transition from a functional frame to a luxury sanctuary happens in the details. The most successful projects integrate lifestyle features during the assembly phase rather than as an afterthought. When you're researching how to install a wall mounted pergola, pay close attention to the internal geometry of the aluminium profiles. These hollow channels are perfect for concealing the cables of an LED lighting kit. Hiding the wiring within the frame preserves the sleek, modern lines of your structure and prevents the cluttered look that ruins many DIY projects. It’s these small, professional touches that turn a simple patio cover into an architectural statement.
Climate control is the final step in achieving year-round utility. You should mount infrared heaters strategically to ensure even heat distribution. Placing them on the side beams, angled toward the seating area, creates a pocket of warmth that resists the evening chill. For those living in densely populated areas, privacy is a frequent pain point. Our decorative panels and side screens offer a stylish solution to being overlooked. They provide a visual barrier that feels intentional and high-end, rather than like a makeshift fence. By combining these elements, you're not just building a pergola; you're engineering a private retreat.
Creating a True Outdoor Room
A garden pergola with sides transforms a standard patio into a sophisticated microclimate. Integrating wind blinds allows you to manage airflow with precision, blocking the biting British wind while keeping the space ventilated. These screens are essential for heat retention during the colder months, acting as a barrier that keeps your infrared warmth where you need it most. It’s the difference between a seasonal garden feature and a permanent lifestyle upgrade that you'll enjoy regardless of the forecast.
The Pergola2Go Advantage
We believe that luxury should be accessible and enduring. Our modular kits are designed for homeowners who value both their time and the quality of their environment. By choosing our systems, you benefit from precision engineering that makes the DIY process feel intuitive and rewarding. We back our craftsmanship with a 10-year structural warranty on all powder-coated aluminium components, ensuring your investment remains a source of pride for a decade or more. Explore our wall-mounted pergola kits and start your transformation today to bridge the gap between your indoor comfort and the beauty of the outdoors.
Transform Your Patio into a Year-Round Sanctuary
You've now mastered the technical foundations of how to install a wall mounted pergola, from selecting the perfect anchors to navigating UK planning rules with confidence. By choosing a wall-mounted design, you're creating a permanent architectural extension that seamlessly bridges the gap between indoor comfort and outdoor beauty. Remember that the secret to a professional finish lies in the precision of your initial measurements and the early integration of lifestyle features like wind blinds and lighting.
It's time to turn these plans into a reality and reclaim your garden. Our kits are engineered from rust-resistant powder-coated aluminium and backed by a 10-year structural warranty for total peace of mind. We provide fast nationwide UK delivery to ensure your project stays on schedule. Browse our range of DIY Wall-Mounted Pergola Kits and start your home's transformation today. You're just a few steps away from a more tranquil, sophisticated way of living.
Frequently Asked Questions
Do I need planning permission for a wall-mounted pergola in the UK?
Most wall-mounted pergolas fall under Permitted Development in the UK, provided they meet specific size and location criteria. You won't usually need permission if the structure is behind the front wall of your house and doesn't cover more than 50% of your garden. Keep the height under 2.5 metres if you're within two metres of a boundary to stay compliant. Always check with your local authority if you live in a Conservation Area or a listed building.
Can I attach a pergola to a house with external wall insulation (EWI)?
You can certainly install a pergola on a house with external wall insulation by using specialized stand-off fixings. These heavy-duty bolts bridge the gap between the aluminium ledger and the structural masonry without compressing the insulation layer. This prevents cold bridging and ensures the thermal integrity of your home remains intact. It’s a precision task that requires careful drilling to avoid cracking the decorative render finish.
What is the best height to mount a pergola on a house wall?
The ideal mounting height for a wall plate is typically between 2.4 and 2.6 metres from the patio floor. This provides a minimum head clearance of 2.1 metres while leaving enough space for French or bifold doors to open freely. When learning how to install a wall mounted pergola, always measure the rotation arc of the louvres to ensure they don't strike your house eaves or existing external light fixtures.
How do I prevent water from leaking between the pergola and the house?
Preventing water ingress requires a combination of high-grade silicone sealant and structural flashing. Apply a continuous bead of sealant behind the wall plate before bolting it to the masonry to create a watertight gasket. For ultimate protection, install a lead or aluminium flashing strip along the top edge of the frame. Our integrated guttering system then channels rainwater through the posts, keeping the area against your house bone-dry.
Can two people really install an aluminium pergola kit themselves?
Two capable adults can successfully install an aluminium pergola kit in approximately one to two days. While the components are engineered for ease of assembly, you'll need a second person to help lift and stabilize the primary cross-beams and wall plate. Our modular designs simplify the process, ensuring that homeowners can achieve a professional-grade result without the need for specialized construction crews or heavy machinery.
What tools are essential for drilling into British brickwork?
An SDS rotary hammer drill is essential for penetrating dense British engineering bricks or stone facades. You'll also need a set of high-quality masonry bits, a long spirit level for horizontal accuracy, and a torque wrench to tighten fixings to exact specifications. Having a pipe and cable detector is also vital to avoid hidden utilities. These tools ensure a secure, permanent connection that reflects the quality of the engineering.
Is it better to use chemical anchors or expansion bolts for a pergola?
Expansion bolts are perfect for modern, solid brickwork because they provide immediate mechanical grip. If your property features older, softer bricks or uneven stone, chemical resin anchors are the superior choice. The resin bonds to the substrate without creating internal pressure, which prevents the masonry from cracking. Choosing the right fixing is a critical step in how to install a wall mounted pergola for long-term structural security.
How does a wall-mounted pergola handle heavy snow loads?
Our aluminium pergolas are engineered to handle significant snow loads common in the UK. The high-grade alloy provides exceptional material strength, while the louvered roof is designed to distribute weight evenly across the frame. During periods of exceptionally heavy snowfall, we recommend keeping the louvres in the open position. This allows snow to pass through rather than accumulating, protecting the drive mechanism and maintaining the structure's aesthetic integrity.


