
Why settle for a standard patio when you can engineer a professional-grade sanctuary with your own hands in just forty-eight hours? You likely already know that a premium outdoor space adds immense value to your lifestyle and property. However, the thought of a DIY aluminium pergola kit assembly often brings a wave of hesitation. It's completely normal to feel a bit of pressure when handling precision-engineered, powder-coated components or calculating the exact placement for ground fixings. You want the luxury of a louvered roof without the stress of a misaligned mechanism.
This guide is designed to replace that uncertainty with the quiet confidence of a master builder. We'll show you how to master the "measure twice, bolt once" methodology to ensure your new structure is perfectly level and structurally sound. You'll gain the skills to transform your backyard into an elegant, functional room that rivals any high-end architectural project, all while avoiding the high costs of professional labor.
We are covering every critical step, from navigating local 2026 permit requirements to the final, satisfying click of a perfectly aligned louvered roof. You'll also discover how to successfully integrate luxury accessories like LED lighting kits and infrared heaters. By the end of this weekend, your outdoor area won't just be finished; it will be an elevated retreat ready for year-round enjoyment.
Key Takeaways
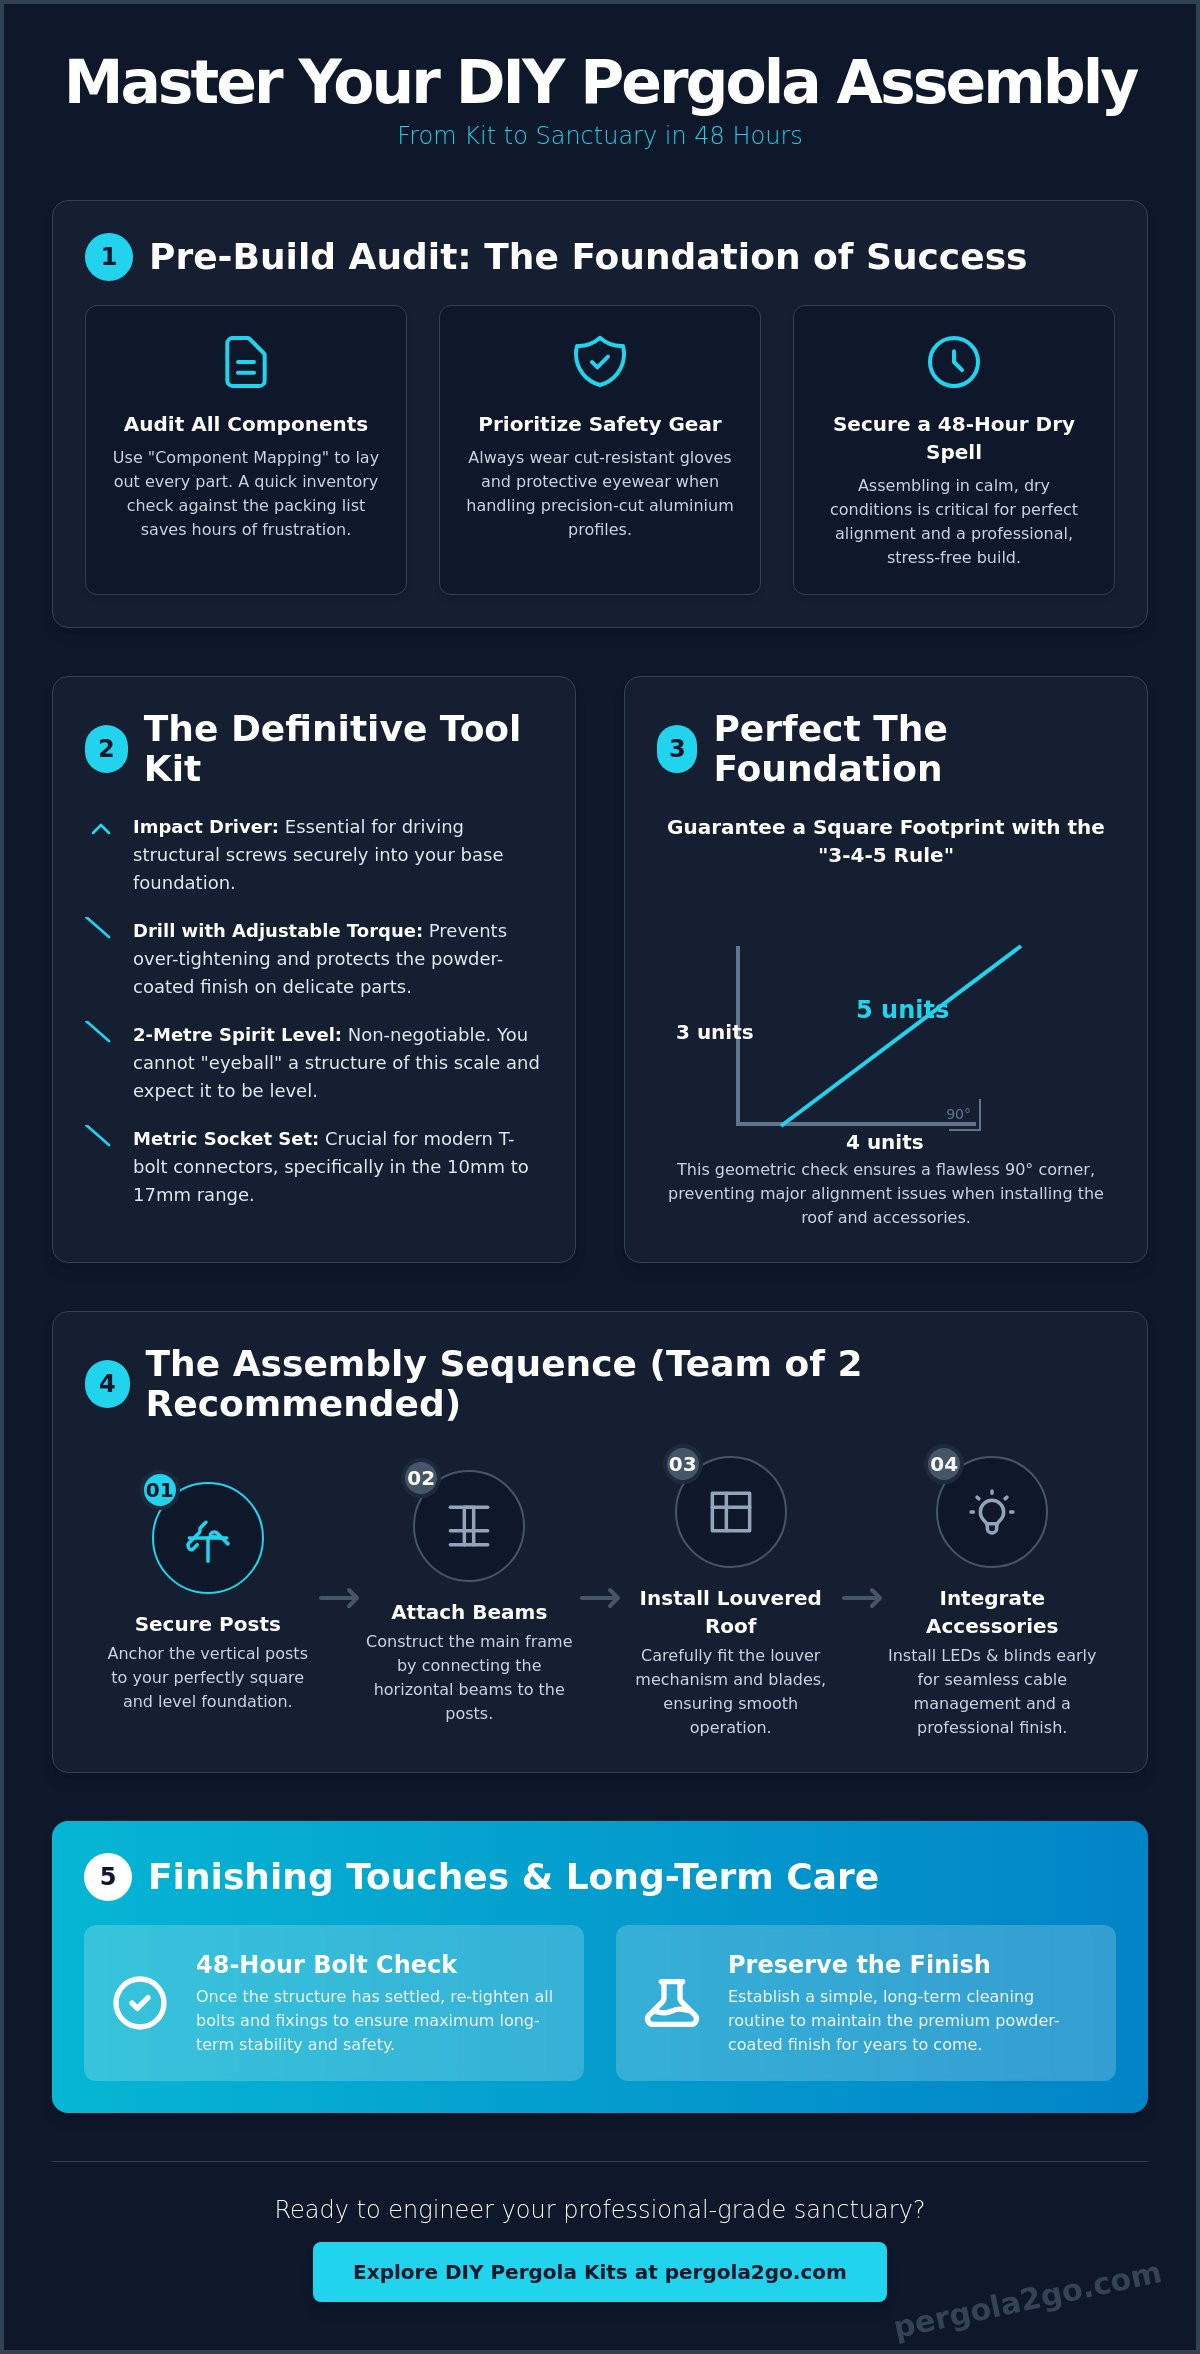
- Audit your components and safety gear before you begin to save hours of frustration during your DIY aluminium pergola kit assembly.
- Apply the "Three-Four-Five" rule to guarantee a perfectly square footprint, ensuring your structure's integrity starts with a flawless foundation.
- Follow a logical post-to-beam construction sequence that simplifies the frame assembly process for a team of two.
- Integrate luxury accessories like LED lighting kits and wind blinds early in the build to ensure seamless cable management and professional results.
- Establish a long-term maintenance routine with a 48-hour bolt check and specific cleaning protocols to preserve the premium powder-coated finish.
Essential Preparation and Tool Checklist for Pergola Assembly
Success in any high-end outdoor project begins long before the first bolt is tightened. A meticulous pre-build audit is your secret weapon against mid-project frustration. By dedicating an hour to organizing your space, you ensure the DIY aluminium pergola kit assembly remains a rewarding experience rather than a logistical puzzle. This preparation phase is where you transition from a property owner to a precision engineer, setting the stage for a flawless transformation.
Use the "Component Mapping" technique to streamline your workflow. Lay out every profile and connector in a clear, accessible grid near your build site. This fast retrieval method prevents the frantic search for a specific bracket when you're mid-lift. Safety remains paramount throughout this process. Always wear cut-resistant gloves and protective eyewear when handling large aluminium profiles. These materials are engineered for incredible durability, but their precision-cut edges require respect during the initial stages of assembly.
Timing is everything. For those building in the UK, it's vital to secure a clear 48-hour dry spell. While high-grade aluminium is naturally weather-resistant, assembling a complex structure during wind or rain is a recipe for alignment errors. You need calm conditions to ensure every beam is perfectly plumb and every louver is adjusted without the interference of the elements. A steady environment allows you to focus on the fine details that define a professional-grade finish.
The Definitive DIY Tool Kit for Aluminium Structures
Having the right gear transforms a difficult task into a satisfying craft. An impact driver is essential for driving structural screws into your base, but you'll also need a standard drill with adjustable torque settings for more delicate components. Over-tightening can mar the sleek, powder-coated finish you've invested in. A 2-metre spirit level is non-negotiable; you simply cannot eye-ball a structure of this scale and expect the louvered roof to function correctly. Ensure your socket set includes a full range of metric sizes, specifically targeting the 10mm to 17mm range common for modern T-bolt connectors.
Unboxing and Component Verification
Before diving into the build, perform a thorough verification against the packing list. This step ensures zero downtime once you're on the ladder. Take a moment to understand the architectural context of your project by researching What is a Pergola? to appreciate the structural principles and history involved. Inspect all powder-coated surfaces for transit damage before you begin. It's much easier to address a minor cosmetic issue now than after the frame is upright. For more details on material grades and what to expect from your kit, refer to our aluminium pergola uk ultimate guide. This verification process guarantees your DIY aluminium pergola kit assembly proceeds with the precision your home deserves.
Site Preparation: Foundations and Ground Fixing Requirements
Your outdoor transformation relies entirely on the ground beneath it. A stable base is the difference between a structure that lasts decades and one that shifts with the seasons. Before you begin your DIY aluminium pergola kit assembly, verify that your patio or deck is structurally sound and level. This isn't just about aesthetics; it's about engineering a permanent lifestyle upgrade that remains safe and functional year-round. While you might be eager to start the build, spending time on the foundation ensures the precision-engineered components fit together without resistance.
Use the "Three-Four-Five" rule to guarantee your footprint is perfectly square. Measure three units along one side and four units along the adjacent side. If the diagonal between these points is exactly five units, your corner is a perfect 90 degrees. Repeat this for all four corners. Precision at this stage prevents alignment issues when you reach the louvered roof installation. For those new to structural layouts, consulting a step-by-step guide to pergola construction can provide additional clarity on geometry and site marking.
Managing drainage is equally vital for longevity. Align your structure with existing patio runoff to prevent water from pooling at the base of the posts. Most modern patios feature a slight fall to move moisture away from the home's foundation. Your pergola should respect this slope while maintaining a level roofline. If you're debating between a wall-mounted or freestanding configuration, consider your home's architecture. A Free Standing Pergola offers total placement flexibility, while wall-mounted versions create a seamless extension of your indoor living space.
Fixing to Concrete, Stone, and Decking
Choosing the right heavy-duty fixing is critical for structural integrity. Expansion bolts are the standard for solid concrete, providing a mechanical grip that resists high wind loads. If you're fixing into natural stone or older masonry, chemical anchors offer a stress-free bond that won't crack the substrate. When securing to timber or composite decking, don't simply screw into the boards. You must reinforce the joists underneath to ensure the load is transferred to the deck's frame. If your surface is slightly uneven, use stainless steel shim plates to achieve a professional, level finish without compromising the sleek look of the base plates.
Wall-Mounting Essentials for UK Homes
Wall-mounted configurations require identifying load-bearing points on external brickwork. Avoid fixing into mortar joints; always aim for the center of the brick to maximize pull-out resistance. Modern UK cavity walls require specialized fixings to avoid crushing the outer leaf when tightening the wall plate. You must also ensure a watertight seal at the mounting point to prevent moisture from entering the cavity. This attention to detail prevents thermal bridging and protects your home's insulation. By following these protocols, your DIY aluminium pergola kit assembly will result in a secure, high-end addition that feels like a natural part of your property.
The Assembly Process: A Logical Guide to Frame Construction
Moving from a prepared site to a standing structure is the most exhilarating phase of your project. This stage of the DIY aluminium pergola kit assembly requires a strategic post-to-beam sequence to maintain safety and architectural integrity. You'll need at least one partner for this phase; while the aluminium is lightweight compared to timber, the sheer scale of the crossbeams requires two sets of hands to ensure a controlled, steady lift. Attempting to balance a four-metre beam solo risks damaging the precision-machined joints or, worse, the premium powder-coated finish.
As you secure the perimeter, your primary focus is ensuring the main rafters are perfectly level and parallel. Even a millimetre of deviation at the base can translate into a significant gap at the roofline. Use your spirit level constantly. While you work, remember that structural safety isn't just about your immediate comfort; it's about adhering to local building codes to ensure your new outdoor room is a permanent, legal asset to your home. This attention to detail ensures the frame acts as a rigid, dependable skeleton for the luxury features to come.
One critical step often overlooked in generic tutorials is the integration of the internal guttering system. Unlike traditional structures, modern aluminium kits hide drainage within the beams. You must verify that the hidden channels are clear of debris and correctly seated before final bolting. This internal logic is what allows for a sleek, minimalist aesthetic without the clutter of external pipes. Manage your torque settings carefully during this process. Over-tightening can strip the threads of the T-bolts, while under-tightening compromises the wind resistance of the entire structure. Aim for a firm, seated connection that feels solid without forcing the hardware.
Erecting the Main Uprights and Crossbeams
Begin by positioning your uprights and using temporary bracing to keep them plumb. This creates a safe "cage" for the crossbeams to be lifted into. When lifting the main profiles, use a synchronized movement with your partner to guide the beam into the post-head connectors. For a deeper look at how these components create a weather-shielded environment, see our guide on the pergola with roof. This structural logic is designed for speed, allowing the main frame to be standing within just a few hours.
Installing the Louvered Roof Mechanism
The louvered roof is the centerpiece of your build, offering total control over sun and shade. Place each individual louver into its designated pivot point, ensuring the nylon bushes are correctly seated for silent operation. Once the blades are in place, connect the drive rod. Whether you've chosen a manual or motorised version, test the movement immediately. You're looking for a "closed seal" where the louvers overlap perfectly, ensuring rainwater is diverted into the internal gutters rather than onto your patio furniture.
Installing Accessories: Louvered Roofs, Blinds, and LEDs
A truly professional-grade finish lies in the details that most observers never see. During your DIY aluminium pergola kit assembly, the transition from a structural frame to a luxury outdoor room happens when you integrate your chosen accessories. This isn't just about adding features; it's about future-proofing your investment. Successful cable management must occur before the final structural bolts are torqued. By feeding your wiring through the hollow internal channels early, you maintain the sleek, minimalist aesthetic that defines high-end engineering. You don't want visible cables cluttering your serene sanctuary.
Privacy and comfort are the cornerstones of an elevated lifestyle. Integrating a garden pergola with sides allows you to curate your environment, shielding your space from prying eyes or the unpredictable UK breeze. Position your wind blinds on the windward elevations to create a microclimate that stays comfortable even as the sun sets. For those seeking year-round utility, mounting infrared heaters is a game-changer. Ensure you maintain the manufacturer's recommended safety distances from the powder-coated beams and consult a qualified electrician for the final mains connection to guarantee structural and electrical safety.
Fitting Integrated LED Lighting Kits
Illuminate your evenings with precision-fitted lighting. Feed the LED strips into the pre-machined grooves within the louvered profiles or perimeter beams. This hidden placement provides an ambient glow without the harshness of direct bulbs. Secure the driver and control box inside a moisture-proof housing, typically tucked away within the post head or a dedicated cavity. Always test the dimming functions and remote synchronization before you close the beams for good. It's much easier to adjust a connection now than after the structure is fully sealed.
Adding Side Screens and Decorative Panels
Side screens transform your pergola into a versatile, all-weather pavilion. Install the vertical side tracks first, ensuring they are perfectly plumb to allow the blind to travel smoothly without snagging. When fitting the fabric, tension is your primary goal. Correct tensioning prevents unsightly ripples and eliminates the annoying "wind-slap" sound during gusty weather. If you're adding decorative panels, secure them with the provided stainless steel hardware to create a permanent architectural statement that reflects your personal style.
Ready to complete your outdoor vision? Explore our range of high-performance Wind Blinds to find the perfect match for your new structure.
Finishing Touches and Long-Term Maintenance Protocols
Your outdoor sanctuary is finally standing. The heavy lifting of the DIY aluminium pergola kit assembly is behind you, but the final refinement ensures your investment remains a centerpiece of your home for decades. A structural walkthrough is your first priority. After the first 48 hours of exposure to wind and temperature shifts, revisit every primary bolt. Metal expands and contracts naturally; this small act of precision ensures that the frame has settled correctly into its permanent position. It's the hallmark of a professional-grade build and provides the peace of mind that your structure is truly secure.
Preserving that deep, matte powder-coated finish is surprisingly simple. Use a soft cloth and pH-neutral soapy water to lift dust or garden pollen. Never reach for abrasive sponges or harsh chemical solvents; these can degrade the protective layer over time. Regular rinsing prevents the buildup of organic matter that can eventually lead to staining. Internal drainage is a marvel of modern engineering, but it requires a seasonal audit. In UK gardens, autumn leaves can easily find their way into the upper channels. Clear these out twice a year to ensure rainwater always exits through the base of the posts as intended. Keeping a log of these simple checks is more than just good practice; it's how you validate your 10-year structural warranty, proving the structure has been cared for according to the manufacturer's standards.
Testing Drainage and Louver Operation
Perform a "Water Test" by running a hosepipe over the roof for several minutes. Watch the water flow through the internal gutters and out the drainage exits at the base of the posts. If you notice sluggish movement, check for debris at the entrance of the downpipes. For the louvers, a light application of silicone-based spray on the pivot points twice a year keeps the operation silent and smooth. Don't use oil-based lubricants, as these attract grit that can cause friction. You may also need to slightly adjust the louver tension as the seasons change to maintain a perfect, watertight seal during the colder months.
Seasonal Care for a Year-Round Sanctuary
When winter arrives in the UK, leave your louvers slightly open if heavy snow is forecast. This prevents excessive weight buildup and allows the wind to pass through the structure safely during seasonal storms. If you've installed side screens, keep the bottom tracks clear of grit and small stones to prevent the fabric from jamming or tearing. Coastal properties should be cleaned every three months to combat salt spray, whereas inland locations typically only require a biannual wash to maintain their pristine appearance. By following these simple steps, your pergola remains a high-end retreat ready for any weather.
Begin Your Weekend Transformation Today
Mastering your DIY aluminium pergola kit assembly is more than a simple home improvement project; it's a gateway to a sophisticated, year-round lifestyle. By focusing on meticulous site preparation and following a logical construction sequence, you've ensured that your new outdoor room is both structurally sound and aesthetically flawless. You now have the knowledge to maintain your precision-engineered louvered roof and integrate luxury accessories that provide comfort in every season. This structural addition doesn't just change your garden; it elevates how you experience your home.
We've simplified the path to luxury so you can focus on the enjoyment of your space. Our structures are crafted from rust-resistant powder-coated aluminium and backed by a 10-year structural warranty for your peace of mind. With fast UK nationwide delivery, your project can begin sooner than you think. Browse our range of easy-to-assemble DIY Pergola Kits and take the first step toward your property’s transformation. You have the tools and the guide; now it's time to build the sanctuary you deserve.
Frequently Asked Questions
How many people are needed for a DIY aluminium pergola assembly?
You need at least two to three capable adults to safely manage the build. While the high-grade aluminium profiles are engineered to be lightweight, the sheer length of the main crossbeams requires a coordinated lift to prevent any structural bending. Having a third person available to manage the temporary bracing and tool retrieval makes the process significantly smoother and safer.
How long does it take to assemble a standard 3x3m pergola kit?
A standard 3x3m DIY aluminium pergola kit assembly typically takes between four and eight hours to complete from start to finish. This estimate assumes your foundations are already prepared and you have all the necessary tools to hand. If you're integrating luxury accessories like LED lighting kits or wind blinds, you should allow an additional two hours for precise cable management and track alignment.
Do I need planning permission for a DIY aluminium pergola in the UK?
Most domestic pergolas are considered "permitted development" and don't require formal planning permission in the UK. This generally applies if the structure is under 2.5 metres high when placed within two metres of a boundary, or up to 3 metres high elsewhere. However, rules can vary for listed buildings or conservation areas, so it's always wise to check with your local planning office before you begin.
Can I install an aluminium pergola kit on existing timber decking?
Yes, you can install your pergola on timber decking, but you must ensure the posts are anchored into the structural joists beneath the boards. Simply screwing into the deck boards isn't enough to secure the unit against high winds. You'll likely need to add extra timber blocking or noggins under the deck to create a solid, heavy-duty fixing point for the expansion bolts.
What is the most difficult part of the pergola assembly process?
Most homeowners find that achieving a perfectly square and level frame is the most technical part of the project. If the base isn't precisely aligned using the "Three-Four-Five" rule, the louvered roof louvers might not rotate smoothly or seal correctly. Taking an extra thirty minutes to verify your measurements at the start prevents mechanical frustration during the final stages of the build.
Are the tools required for assembly included in the kit?
Your kit will typically include specialized hardware like T-bolts and hex keys, but you'll need to provide your own standard power and manual tools. You should have an impact driver, a metric socket set, and a 2-metre spirit level ready before you begin. Having these tools prepared ensures your DIY aluminium pergola kit assembly proceeds without unnecessary interruptions or trips to the hardware store.
Can the pergola be assembled alone, or is a professional required?
You shouldn't attempt to assemble the pergola alone because the structural beams require two people to lift and secure them simultaneously. While the kit is designed for straightforward DIY assembly, a solo build increases the risk of damaging the premium powder-coated finish or causing personal injury. You don't need a professional installer, but you definitely need a reliable partner to help with the heavy lifting.
How do I ensure the louvered roof is completely watertight after assembly?
You ensure a watertight seal by verifying that each louver is correctly seated in its pivot bush and that the internal gutters are clear of debris. Once the assembly is complete, close the roof and perform a "water test" with a garden hose to check the flow. If you see leaks, it's usually a sign that the frame isn't perfectly level or the drive rod needs a slight tension adjustment to close the blades fully.


