
Imagine the delivery van pulls away, leaving you with a sleek aluminium kit, only for you to realize the mounting rail sits exactly where your boiler flue exits the wall. It's a common anxiety for UK homeowners who want to transform their terrace but worry that a few misplaced millimetres will ruin a high-end investment. You deserve a seamless transition from your home to your garden, yet the technicalities of masonry and louvered roof clearances often feel like a barrier to that vision.
By accurately measuring for a wall mounted pergola, you'll replace that hesitation with the quiet confidence of a professional installer. We've simplified the process to ensure your new structure fits your specific property like a bespoke suit. This guide provides a clear roadmap for navigating downpipes, calculating vital door clearances, and creating a precise dimension list. You'll soon have all the data needed to select a kit that turns your outdoor space into a year-round sanctuary of luxury and comfort.
Key Takeaways
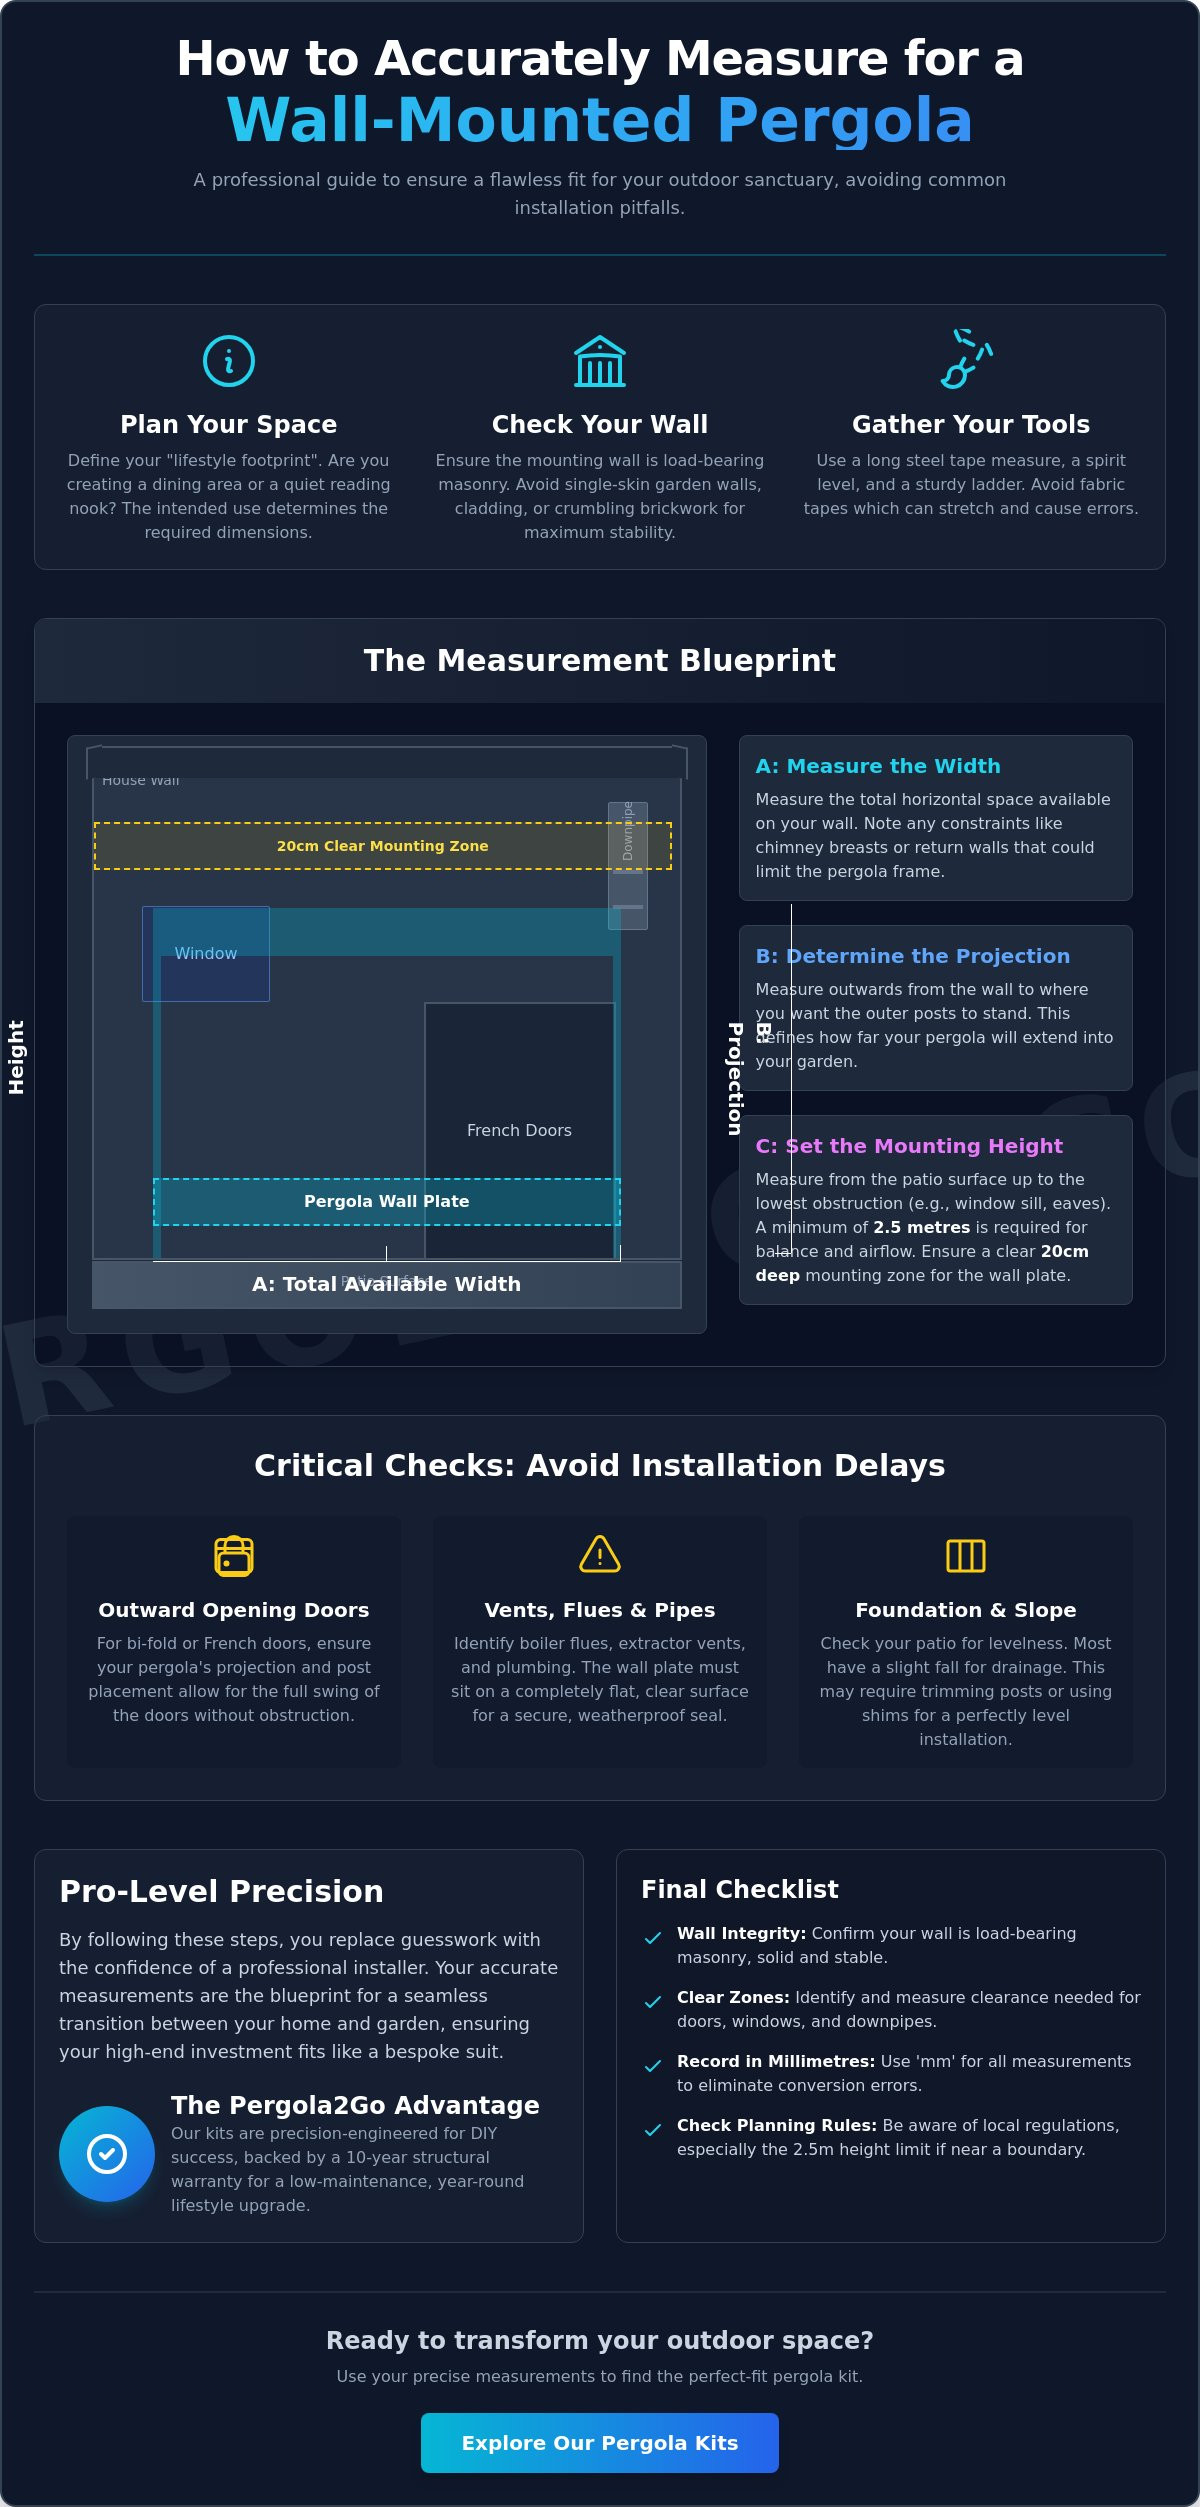
- Confirm your wall is load-bearing masonry and gather tools like a long steel tape and spirit level to ensure a foundation of precision.
- Master the sequence of measuring for a wall mounted pergola by accurately mapping out the total available width and the required projection for your outer posts.
- Avoid installation delays by identifying physical obstructions like downpipes and calculating the clearance needed for outward-opening bi-fold or French doors.
- Learn how to translate your garden's dimensions into standard modular kit sizes, understanding the critical difference between the total footprint and internal space.
- Discover why choosing a powder-coated aluminium structure with a 10-year structural warranty provides a low-maintenance, year-round lifestyle upgrade.
Essential Preparation and Planning for Your Pergola Survey
Success begins long before you pull out the tape measure. It starts with a clear vision of how your new structure will anchor your outdoor life. Before you begin measuring for a wall mounted pergola, take a moment to survey your property with a critical, professional eye. You will need a long steel tape measure for accuracy, a reliable spirit level, and a sturdy ladder to reach your intended mounting height. Using a steel tape is vital; fabric versions can stretch over long distances, leading to errors that compromise a precision fit.
Think about your "lifestyle footprint" during this initial phase. Are you creating an alfresco dining room for large family gatherings or a quiet, sheltered reading nook? The way you intend to use the space beneath the louvres dictates the dimensions you will eventually record. Understanding What is a Pergola? helps frame your project. It is more than just a roof; it is a structural extension of your home’s character and a gateway to year-round utility.
Choosing the Ideal Wall Mounting Point
Your primary mounting wall must be a load-bearing masonry structure to support the weight of the precision-engineered aluminium. Inspect the brickwork for any signs of crumbling or instability. You should always aim to secure your fixings into the centre of the bricks rather than the mortar joints to ensure maximum pull-out strength and long-term stability. Avoid mounting onto single-skin garden walls or decorative cladding that lacks structural integrity.
Check the interior side of the wall for radiators, boiler flues, or electrical sockets. These often indicate hidden plumbing or wiring that you must avoid during the drilling process. Finally, look up. You need a minimum mounting height of 2.5 metres. This height ensures optimal air circulation when the louvres are open and maintains a sense of architectural balance against your property, preventing the space from feeling enclosed or cramped.
The Importance of a Level Foundation
A flawless installation relies on a stable, predictable base. Use your spirit level to assess the patio’s surface. Most UK patios are designed with a slight fall away from the house to manage rainwater drainage. While aluminium systems are incredibly durable, you must identify the degree of this slope early. This allows you to plan your post placement with confidence.
When measuring for a wall mounted pergola, determine if your outer posts will sit on solid concrete or reinforced paving. If the ground is significantly uneven, you may need to use structural shims or consider trimming the aluminium posts for a perfectly level finish. A solid foundation prevents structural stress and ensures your integrated drainage system functions exactly as designed, keeping your luxury retreat dry and comfortable.
Step-by-Step: Measuring for Your Wall Mounted Pergola
Precision is the hallmark of a professional installation. When you begin measuring for a wall mounted pergola, your goal is to translate your physical space into a digital blueprint that ensures a flawless fit. Record every dimension in millimetres. This level of detail eliminates the guesswork that often leads to installation delays. Start by measuring the total available width of your mounting wall. You must note any corner constraints, such as return walls or protruding chimney breasts, that might limit where the structural frame can sit.
It's also the right time to consider the legal framework of your project. Most installations fall under permitted development, but you should consult the official guidelines for UK Planning Permission for Pergolas to ensure your proposed height and location comply with local regulations. For instance, if your structure sits within two metres of a property boundary, the total height is generally capped at 2.5 metres. Keeping these limits in mind during the measuring phase prevents costly adjustments later.
Determining the Mounting Height
Measure the vertical distance from your patio to the lowest permanent obstruction on your wall. This is usually the underside of the eaves, a first-floor window sill, or an extractor vent. You must account for the thickness of the pergola's main beam to ensure the louvered roof can rotate through its full range without hitting the masonry. The mounting zone is a clear horizontal band on your masonry at least 20cm deep. This zone must be completely free of obstructions to allow the wall plate to sit flush against the brickwork, providing a secure, weather-tight seal for the life of the structure.
Measuring Projection and Width
Determine your projection by measuring from the wall out to the intended position of the outer posts. This is the depth of your new living area. If you plan to add wind blinds or side screens, ensure your width measurement allows for the housing of these accessories without blocking your view or access points. A critical step often missed is checking for "squareness." Measure the diagonals of your planned footprint from the wall corner to the opposite post location. If the two diagonal measurements are equal, your site is perfectly square. Once you have these figures, you can browse the available wall mounted pergola sizes to find the modular kit that best fits your bespoke requirements.
Finalise your survey by marking the proposed post locations on the ground with chalk or masking tape. This simple act allows you to walk the space and visualise the final structure. It's the best way to confirm that your chosen dimensions provide enough room for furniture and clear walkways before you commit to your order.
Navigating Obstructions: Doors, Windows, and Downpipes
Your home's exterior is rarely a blank canvas. It's a functional map of service pipes, ventilation flues, and access points that must be respected during your survey. When measuring for a wall mounted pergola, you aren't just looking for empty brickwork; you're identifying the "active" zones of your property. A successful installation accommodates these features without compromising the structural integrity or the sleek aesthetic of the aluminium frame. Precision here prevents the frustration of a wall plate clashing with a downpipe or a louvered roof blocking a vital boiler vent.
Safety and compliance are paramount when working around utilities. Boiler flues, for instance, require specific clearances to ensure exhaust gases disperse safely and don't overheat the pergola's powder-coated finish. Most UK building regulations suggest a minimum clearance of 300mm to 600mm depending on the boiler's output. Integrating these technical requirements with RHS design and construction advice ensures your new structure remains both beautiful and safe. By planning for these obstructions now, you'll ensure your outdoor sanctuary feels like a natural, intentional extension of your architecture.
Clearance for Inward and Outward Opening Doors
French doors and bi-folds are the primary gateways to your garden, and they require careful vertical calculation. Measure from the patio to the top of the door frame, then add a safety margin of at least 15cm. This extra space ensures that when the louvres are in their fully vertical position, they don't foul the door as it swings open. You should also consider the horizontal alignment of your posts. Position them so they don't bisect your view through a large glass pane. A well-placed post should frame your garden, not obstruct the seamless transition between your kitchen and the terrace.
Managing External Wall Fixtures
Vertical downpipes are the most common hurdle when measuring for a wall mounted pergola. You have two professional options: you can either offset the wall plate so it sits adjacent to the pipe, or use a bespoke spacer to mount the plate slightly away from the masonry. This allows the pipe to run behind the pergola's frame undisturbed. Don't forget to locate external taps and power sockets. If a post is destined to sit directly over a tap, you'll need to adjust your width or projection by a few millimetres to maintain access. Finally, evaluate your lighting. Security cameras and PIR lights in the mounting zone may need to be relocated higher or to the side to ensure your new living space remains well-lit and secure.
Comparing Your Measurements to Modular Kit Sizes
You've mapped your wall and identified every obstruction with precision. Now comes the moment of alignment. Most premium aluminium kits are designed in modular increments, such as 3x3m, 3x4m, or 4x4m. When measuring for a wall mounted pergola, you must decide if your space accommodates a standard size or if you require a more tailored configuration. It is a common mistake to assume the "3x3m" label refers to the usable floor space. In reality, that figure usually represents the total external footprint of the roof structure.
The internal post-to-post distance is slightly less than the roof dimensions. This distinction is vital if you've already purchased a specific dining set or a large outdoor sofa. You want your furniture to have at least 300mm of breathing room on all sides to maintain a sense of tranquility and luxury. If your measurements sit between two modular sizes, it is often wiser to choose the larger kit to ensure your "lifestyle footprint" isn't compromised. A cramped terrace quickly loses the aspirational appeal of a professional-grade transformation.
Understanding Overhangs and Post Placement
Modern aluminium pergolas typically feature a sleek, flush finish where the beams meet the posts. This differs significantly from traditional timber designs that often have rafter overhangs. Verify the dimensions of the post base plates before you finalize your order. These plates must sit securely on your patio slabs or a dedicated concrete pad for stability. Ensure your post placement doesn't interfere with drainage covers or manholes. Relocating a post is difficult once the masonry is drilled; precision at this stage is non-negotiable for a flawless finish.
Future-Proofing with Integrated Accessories
Think beyond the immediate installation. If you plan to add wind blinds or side screens later, allow for the extra width required by the side tracks. These accessories transform your terrace into a year-round room, providing protection from the unpredictable UK climate. You can explore a garden pergola with sides to see how these additions enhance your property's value. Additionally, ensure your mounting height allows for infrared heaters to be positioned at a safe distance from both the louvres and your guests. Planning for these integrated LED kits and heating solutions now ensures your outdoor space is ready for immediate enjoyment. Once you've confirmed your ideal dimensions, you can view our range of wall mounted pergolas to find the perfect match for your home.
The Pergola2Go Advantage: Precision Engineering for DIY Success
Once you have mastered the art of measuring for a wall mounted pergola, the path to an elevated lifestyle is clear. We've designed our systems to ensure that the precision you've applied to your survey is matched by the engineering in our kits. This commitment to accuracy mirrors the standards found in industrial quality control, where firms like Robustech s.r.o. provide comprehensive 3D measurement services to ensure every component meets exact specifications. Our goal is to remove the complexity from high-end outdoor design. You aren't just buying a structure; you're securing a permanent extension of your home that offers year-round utility and effortless sophistication. Every component is crafted to fit perfectly, turning what once felt like a daunting DIY task into a rewarding project that adds tangible value to your property.
High-Quality Aluminium vs. Traditional Materials
Choosing aluminium is a strategic decision for the long-term value of your home. While timber might offer an initial rustic charm, it quickly becomes a maintenance burden in the face of the UK's relentless rain and shifting temperatures. Our powder-coated aluminium frames are immune to the rot, warping, and cracking that plague wooden alternatives. They offer a sleek, industrial durability that complements modern architecture perfectly. The rust-resistant finish ensures your structure stays looking pristine for years without the need for annual staining or painting. For those still weighing their options, our aluminium pergola uk guide provides a comprehensive material comparison to help you decide with confidence.
Support for Your Transformation Journey
The Pergola2Go experience is built on a foundation of transparency and reliability. We understand that your home is your sanctuary, which is why we offer a 10-year structural warranty on all wall-mounted kits. This isn't just a promise; it's a testament to the strength of our materials and the precision of our manufacturing process. We maintain a fully stocked warehouse right here in the UK to ensure nationwide delivery is fast and efficient. You won't be waiting months for a shipment from overseas. Your transformation can begin as soon as you're ready to start.
Take the next step with the quiet confidence that you've planned every millimetre. By following our guide and using our precision-engineered kits, you're creating more than just a sheltered spot in the garden. You're building a lifestyle sanctuary where memories are made, regardless of the season. From integrated LED lighting to infrared heaters, your new louvered space is ready to become the most used room in your house. The tranquility and pride of ownership you've been searching for are finally within reach. Our modular designs ensure that measuring for a wall mounted pergola leads directly to a flawless, professional-grade result that you can enjoy for decades to come.
Begin Your Outdoor Transformation Today
Mastering the technical details of measuring for a wall mounted pergola is the final step before you begin your property's most significant lifestyle upgrade. You have successfully navigated the complexities of masonry suitability, calculated vital door clearances, and identified how to work around existing wall obstructions. This level of preparation ensures that your new louvered space will fit perfectly, providing a seamless transition between your home and garden that feels intentional and architectural.
Choosing a precision-engineered solution means you don't have to compromise on quality or speed. Our kits feature rust-resistant powder-coated aluminium and are backed by a 10-year structural warranty for total peace of mind. With fast nationwide UK delivery directly from our warehouse, your vision for a year-round sanctuary is closer than ever. It's time to turn those measurements into a tangible reality that enhances your home’s value and your daily comfort.
Shop our range of high-quality Wall Mounted Pergolas and take the first step toward a more tranquil, luxurious outdoor life. Your perfectly measured retreat is waiting.
Frequently Asked Questions
How high should I mount my wall-mounted pergola?
Aim for a mounting height of at least 2.5 metres to ensure optimal air circulation and architectural balance. This height allows the louvres to rotate freely while maintaining an open, airy feel beneath the structure. If you mount it lower, the space can feel enclosed and may interfere with the natural light entering your home's windows. Always check for obstructions like eaves or vents before finalizing your height.
Can I mount a pergola to a wall with a downpipe in the way?
Yes, you can successfully install a wall-mounted unit by using structural spacers or by offsetting the wall plate to sit beside the pipe. Spacers allow the downpipe to run behind the pergola's frame, maintaining your home's drainage without compromising the structure's sleek look. When measuring for a wall mounted pergola, identify the pipe's diameter to ensure you select the correct depth for your spacers.
What is the minimum height clearance for bi-fold doors?
You should allow for a safety margin of at least 15cm above the top of your bi-fold or French door frames. This clearance ensures that the louvered roof mechanism can operate through its full range of motion without clashing with the doors when they're open. It also prevents the structure from feeling too low when you transition from your kitchen to the terrace, ensuring the space feels luxurious and open.
Do I need planning permission for a wall-mounted pergola in the UK?
Most wall-mounted pergolas fall under permitted development rights in the UK and don't require formal planning permission. However, specific height restrictions apply, such as a 2.5-metre cap if the structure is within two metres of a property boundary. It's always best to consult the UK Planning Portal or your local authority if you live in a conservation area or a listed building to ensure full compliance.
Is my house wall strong enough to support an aluminium pergola?
Your mounting wall must be a load-bearing masonry structure, such as solid brick or blockwork, to safely support the weight. Aluminium is significantly lighter than timber, yet it still requires a secure connection to the building's structural core. Avoid mounting onto decorative cladding, single-skin garden walls, or timber-framed extensions without additional structural reinforcement. This ensures the 10-year structural warranty remains valid and your installation stays secure.
How do I measure for a pergola if my patio is sloped?
Measure the vertical height at the highest point of the patio and use a spirit level to determine the degree of the fall. Most UK patios slope away from the house for drainage. You can compensate for this by using structural shims under the post base plates or by carefully trimming the aluminium posts. This ensures your louvered roof remains perfectly level regardless of the ground's pitch, maintaining the system's integrated drainage efficiency.
What tools do I need to accurately measure for a pergola kit?
Gather a long steel tape measure, a spirit level, a sturdy ladder, and chalk or masking tape to mark out your footprint. A steel tape is essential because it won't stretch, ensuring your millimetre-perfect dimensions are reliable. Using chalk to mark post locations on the ground helps you visualize the final living area and confirm there's enough room for your furniture and walkways before you commit to an order.
Should I measure in centimetres or millimetres for my order?
Always record your dimensions in millimetres to match the precision engineering of modern aluminium kits. Measuring for a wall mounted pergola in millimetres eliminates rounding errors that could lead to a poor fit against your masonry. This level of detail is the difference between a standard DIY job and a professional-grade installation that looks like a bespoke architectural feature, ensuring every component aligns perfectly during assembly.


