

Your home's exterior wall is more than just a structural boundary; it's the foundation for a year-round sanctuary that merges indoor comfort with outdoor elegance. You've likely envisioned the perfect alfresco space, yet the technical reality of how to attach a pergola to a house often brings a wave of hesitation. It's natural to worry about piercing your home's insulation, risking damp at the connection point, or accidentally breaching UK planning height restrictions.
We understand that a high-end transformation should feel like a triumph, not a structural headache. This guide provides the expert clarity you need to master the technical and legal requirements for a secure, professional-grade installation. You'll learn how to achieve a leak-free connection to your host building while ensuring full compliance with 2026 building regulations. From navigating the 2.5-meter height limit near boundaries to protecting your house insulation, we'll show you how to turn your garden into a sophisticated, permanent extension of your lifestyle.
Key Takeaways
- Navigate 2026 UK Permitted Development rules, including the critical 2.5-meter height restriction for structures installed near property boundaries.
- Master the technical precision of how to attach a pergola to a house without compromising modern wall insulation or delicate rendered finishes.
- Secure your home against the elements by using professional weatherproofing techniques and flashing to ensure a completely watertight connection.
- Identify the industrial-strength tools and precise measuring techniques required to achieve a professional-grade fit for your wall-mounted aluminium pergola.
- Unlock the lifestyle benefits of a permanent architectural extension that provides year-round utility and natural thermal shading for your living space.
Understanding UK Regulations: Planning and Permissions for Attached Pergolas
Success starts with certainty. Before you pick up a drill, you need to know that your project sits on the right side of UK law. Most homeowners assume a pergola is a simple garden feature, but once you explore What is a Pergola?, you'll see it is a significant architectural addition. When you research how to attach a pergola to a house, the first thing to understand is that the UK government often classifies these structures under Permitted Development rights. This means you can usually proceed without a formal planning application, provided you stay within specific parameters.
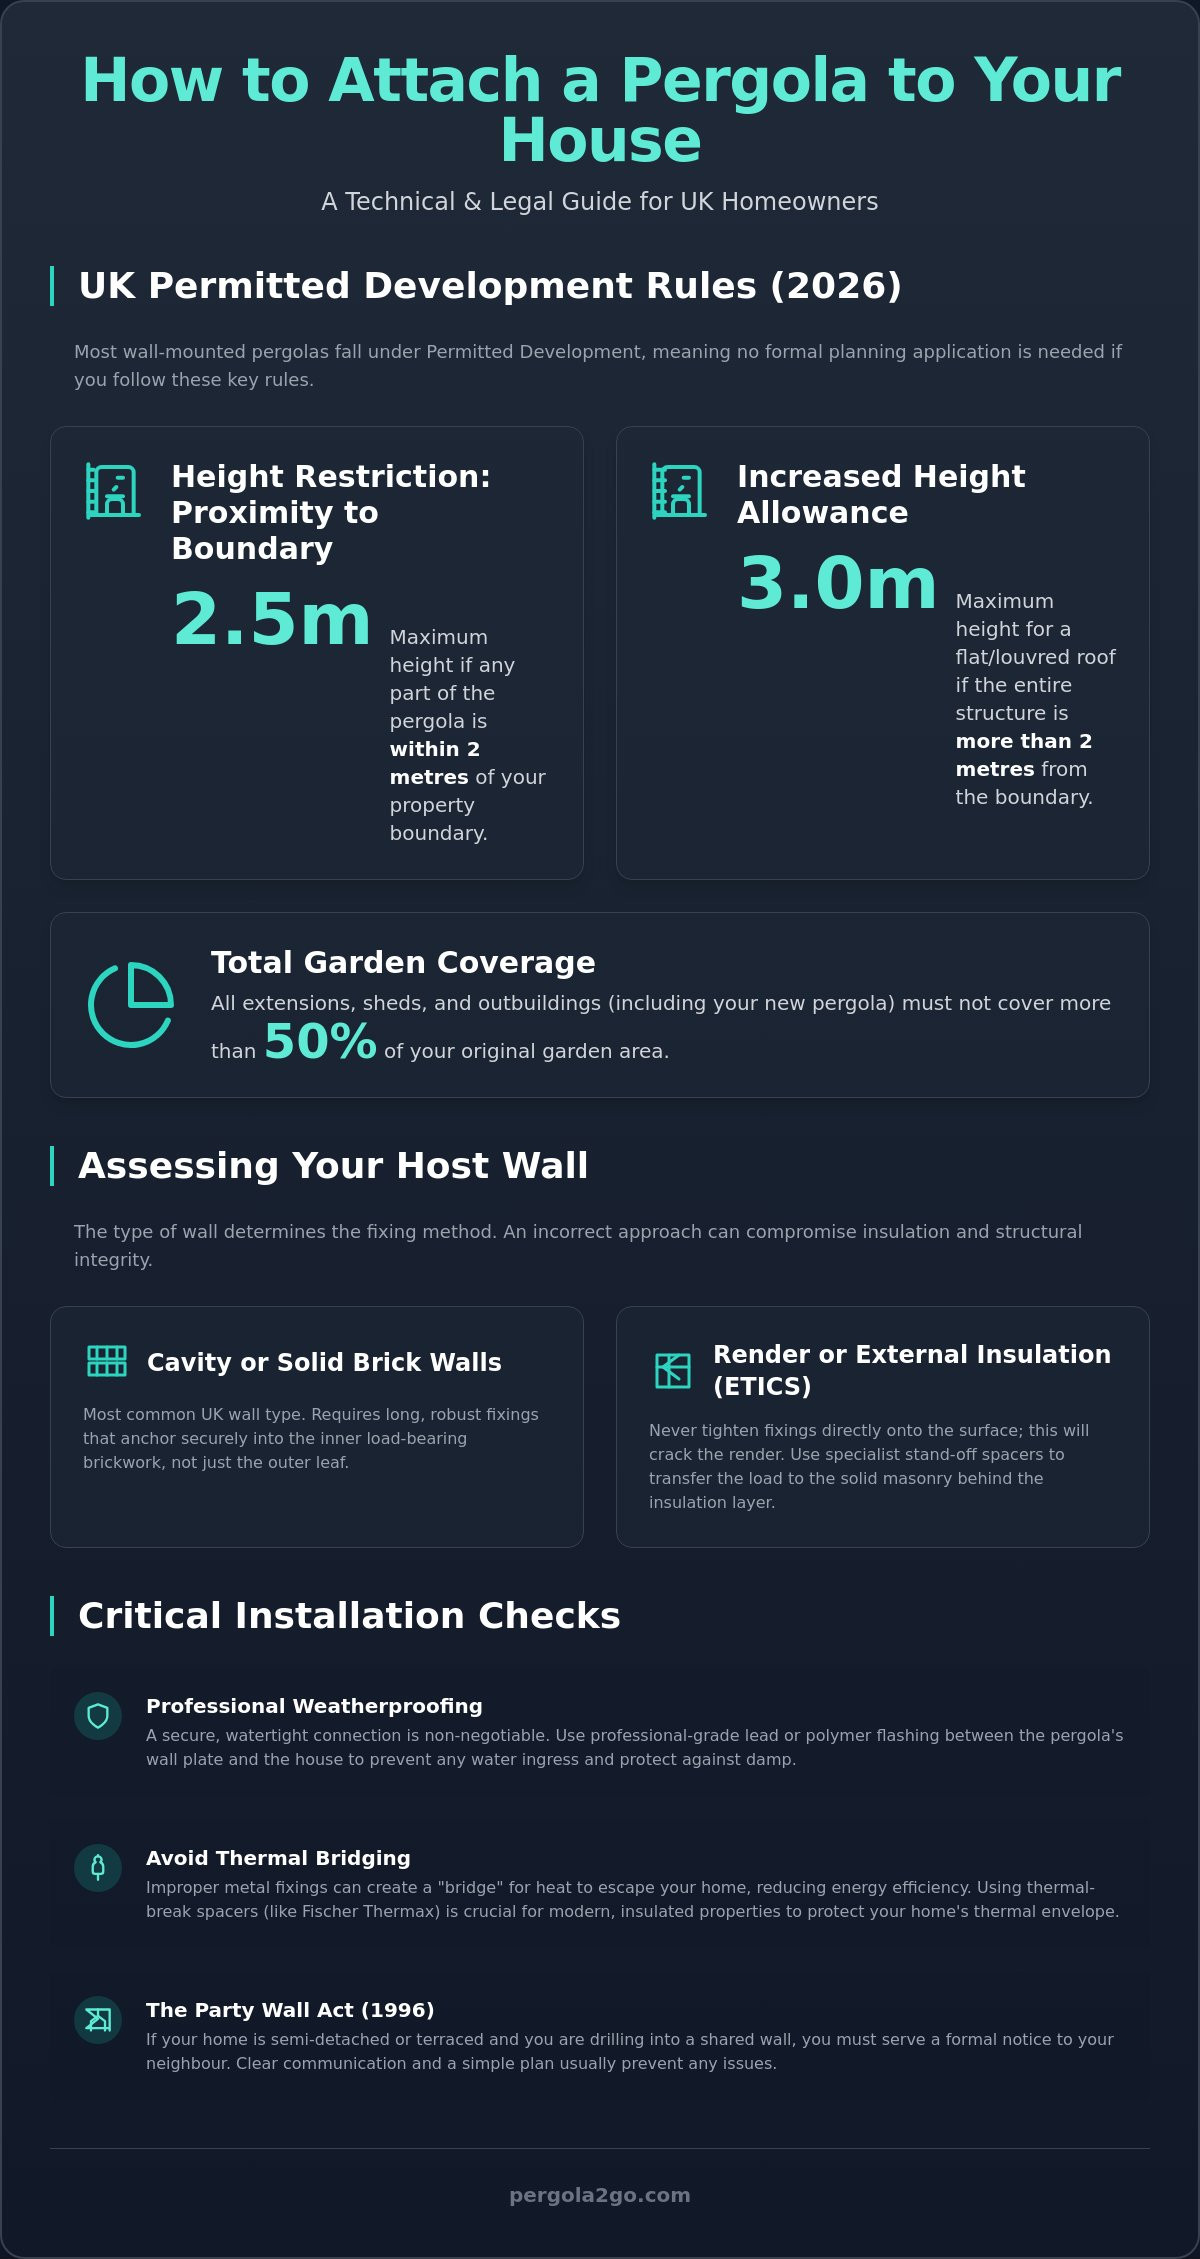
There is a subtle but vital distinction between a "temporary" structure and a permanent attachment. A wall-mounted aluminium pergola is a permanent lifestyle upgrade. Because it is physically bolted to your home, local authorities may view it as an extension rather than a standalone outbuilding. This classification matters because it influences your total built-on area. You must ensure that all extensions and outbuildings combined don't cover more than 50% of your original garden space. It's a generous allowance, but one that requires a quick measurement of your plot before you begin.
Permitted Development Limits for 2026
Precision in design prevents delays in construction. In 2026, the height of your structure is strictly dictated by its proximity to your neighbours. If you're installing your pergola within 2 metres of a boundary, the maximum height allowed is 2.5 metres. This ensures your new sanctuary doesn't feel overbearing to those next door. If you have more space and plan to mount the structure more than 2 metres from the boundary, you can enjoy a height of up to 3 metres for a louvred or flat roof. Be aware that these rights are often restricted in Conservation Areas or for Listed Buildings; in these cases, a quick call to your local planning office is a small step that protects your long-term peace of mind.
The Party Wall Act and Your Neighbours
If you live in a semi-detached or terraced home, how to attach a pergola to a house becomes a collaborative effort. The Party Wall Act 1996 applies if you intend to drill into a wall that you share with a neighbour. While a wall-mounted aluminium pergola is a lightweight and non-intrusive addition compared to a brick extension, you should still serve a formal notice if you're fixing directly into the shared masonry. It's also vital to ensure your structure doesn't block "Right to Light" for adjacent windows. Clear communication and a simple sketch of your plans usually resolve any concerns before they start. A thoughtful approach ensures your new outdoor room is welcomed by everyone on the street.
Assessing Your Host Wall: Brickwork, Render, and Insulation
Your host wall is the structural anchor of your new outdoor living room. Understanding how to attach a pergola to a house starts with a thorough inspection of your masonry. Most UK homes built after the 1930s feature cavity walls, while older properties often rely on solid brickwork. Each requires a specific fixing strategy. If your home is a modern timber-frame construction, precision is paramount. You must locate the internal structural studs because the external cladding often isn't designed to carry heavy loads. Get this right, and your pergola will feel like a natural, rock-solid extension of your architecture.
Energy efficiency is another vital consideration. Modern building standards focus heavily on the "thermal envelope" of your property. Creating an improper connection can lead to "thermal bridging," where heat escapes through the metal fixings. This doesn't just make your home colder; it can negatively impact your EPC rating. While you can check the broader UK Planning Permission for Pergolas for general rules, the technical reality of the attachment point is where the long-term value of your home is protected. A professional-grade installation respects the insulation that keeps your family warm.
Working with Render and External Insulation
Modern facades often use External Thermal Insulation Composite Systems (ETICS) or thick render. Tightening a standard expansion bolt directly against these surfaces is a mistake. The pressure will cause the render to crack and crumble. Instead, use specialist stand-off spacers like the Fischer Thermax system. These components bridge the insulation gap, transferring the load directly to the solid masonry behind. Always seal the entry points with high-quality silicone to prevent moisture from seeping into your wall cavity. This ensures your home remains airtight and dry regardless of the British weather.
Identifying Secure Fixing Points
A secure installation depends on where you choose to drill. Never fix your ledger board to a single course of bricks. Spreading the load across multiple rows provides much better stability and prevents individual bricks from loosening. You should also stay at least 150mm away from any door or window lintels to avoid structural weak points. Be mindful of your damp-proof course (DPC) and ensure your fixings don't interfere with internal utility lines. If you're looking for a streamlined project, our Wall Mounted Pergola kits offer the perfect balance of industrial strength and DIY-friendly design, ensuring you have the right components for a secure fit.
Step-by-Step Installation: Securing Your Wall-Mounted Pergola
Transforming your patio into a sophisticated outdoor retreat requires a blend of physical effort and technical precision. Once you have confirmed your wall type and gathered your materials, the actual process of how to attach a pergola to a house becomes a logical, rewarding sequence of tasks. This is where the quality of your engineering meets the accuracy of your measurements. Before you start, ensure you have a dedicated workspace and a clear understanding of the assembly manual. A professional result depends on the right equipment, so prepare this essential tool checklist:
- SDS Rotary Hammer Drill: Necessary for boring clean, deep holes into tough masonry or brickwork.
- Long Spirit Level: A 1.2m or 1.8m level is vital to ensure your horizontal beams are perfectly true.
- Torque Wrench: Essential for tightening bolts to specific industrial standards without stripping threads.
- Chalk Line or Laser Level: Helps in marking the ledger height across the entire width of the installation area.
Establishing the correct height for your wall-side beam is your first critical step. You need to balance the desired head clearance with the existing architectural features of your home, such as first-floor windows or vents. Even when installing a modern louvred system that appears flat, a subtle "fall" or pitch is often required to ensure efficient water drainage. Aim for a slight gradient that directs rainfall away from the host wall and into the integrated guttering system. This prevents water from pooling against your home and protects the longevity of your investment.
Mounting the Ledger Board or Brackets
Mark your fixing points with absolute precision before you begin drilling. If you are using chemical resin anchors, clean each hole thoroughly with a blower or brush to ensure the bond is rock-solid. Insert the anchor, apply the resin, and allow it to cure fully according to the manufacturer's timings before applying any weight. For optimal structural integrity, M12 expansion bolts must be tightened to a torque of 50-60 Nm to ensure they are securely seated within the masonry without overstressing the host wall. This creates a foundation that can withstand the diverse British climate for decades.
Raising the Frame and Front Posts
Lifting the main aluminium beams is a moment where teamwork is essential. While aluminium is significantly lighter than timber, the long spans can be awkward to handle alone; having a second person ensures the frame is guided safely into the wall brackets without scratching the powder-coated finish. Once the wall side is secure, you can focus on the front posts. These must be perfectly vertical and anchored into a solid base. If you haven't yet finalised your ground surface, you can learn How to prepare your patio for a new pergola to ensure your footings are as durable as the structure they support.
Weatherproofing Your Connection: Flashing and Drainage
UK rain is persistent and unforgiving. Once you have mastered how to attach a pergola to a house, your focus must shift from structural stability to moisture management. A common mistake is relying on a "butt-joint," where the aluminium beam simply rests against the masonry. Without a proper seal, gravity will pull rainwater down your house facade and directly into the gap between the building and your new structure. This leads to unsightly staining, moss growth, and potentially serious damp issues within your wall cavity. Professional weatherproofing is what transforms a simple garden frame into a sophisticated, permanent extension of your home.
Creating a watertight sanctuary requires a physical bridge that diverts water away from the junction. This is best achieved using flashing. While traditional lead remains a popular choice for its longevity and malleability, many modern homeowners prefer lead-alternative flashing that matches the sleek, powder-coated finish of an aluminium frame. This bridge ensures that every drop of rain is directed onto the roof louvres and into the integrated drainage system, keeping the area beneath your pergola dry and your host wall protected from the elements.
Effective Flashing Techniques
Achieving a professional-grade seal starts with a "chase." Use an angle grinder with a masonry blade to cut a shallow groove, approximately 20mm deep, into the mortar line directly above your pergola's ledger beam. Tuck the top edge of your flashing into this groove and secure it with stainless steel clips or lead wedges. Once the flashing is seated, apply a high-quality silicone sealant designed specifically for outdoor masonry to ensure the joint is completely airtight. For more inspiration on creating a versatile outdoor space, see our Pergola with roof: year-round luxury guide.
Guttering and Runoff Management
Modern aluminium pergolas are engineered with internal guttering systems that collect water from the roof louvres. Ensure these channels are configured to direct runoff away from the house facade and toward the front posts. This prevents "splash-back" damp, which can ruin the appearance of rendered walls over time. You should also make it a habit to clear the junction between your house and the pergola every autumn. Leaf build-up in this narrow gap can trap moisture against your home, leading to long-term water ingress. A quick annual check of your silicone seals will ensure your indoor-outdoor transition remains leak-free for decades.
Protect your home with a system designed for the British climate. Explore our range of Wall Mounted Pergola kits, featuring precision-engineered drainage and rust-resistant finishes for total peace of mind.
Transforming Your Lifestyle: The Benefits of a Wall-Mounted Kit
Step through your bifold doors and into a space that feels like a natural extension of your interior. When you master how to attach a pergola to a house, you aren't just building a garden structure; you are redefining the architectural boundaries of your home. A wall-mounted configuration creates a permanent connection that a freestanding unit cannot match. It bridges the gap between your sofa and your garden, offering a sophisticated transition that invites you to spend more time outdoors. This seamless flow turns a simple patio into a purposeful destination for morning coffees or evening entertaining.
Beyond the aesthetic appeal, this attachment offers significant practical advantages for your property's energy efficiency. During the height of a British summer, the louvred roof provides essential thermal shading for the rooms inside your home. By blocking direct sunlight before it hits your glass doors, you can lower internal temperatures and keep your living space comfortably cool. Unlike heavy, traditional timber structures that require constant maintenance and can place undue stress on your masonry, a modern aluminium system offers industrial-strength durability with a fraction of the weight. It is a sleek, low-maintenance solution designed for the modern homeowner.
The "Garden Room" Effect
Attaching your structure directly to the host wall creates a sheltered sanctuary that feels remarkably cozy and secure. This transition zone is the perfect environment for adding luxury upgrades like infrared heaters or LED lighting, as the house wall provides a natural windbreak and easy access to power. Adding a Garden pergola with sides for year-round living can also significantly boost your property's market value. It transforms an ordinary patio into a high-end, multi-functional outdoor room that serves as a permanent lifestyle upgrade rather than a seasonal addition.
The Pergola2Go 10-Year Structural Promise
We believe that a premium home improvement project should be both accessible and enduring. Our kits are precision-engineered from rust-resistant, powder-coated aluminium, designed specifically to withstand the rigours of the UK climate without warping, rotting, or fading. While the technicality of how to attach a pergola to a house might seem complex, our modular components are designed for a straightforward installation by just two people. We back our engineering with a 10-year structural warranty, giving you total peace of mind for your investment. Ready to elevate your home? Explore our range of wall mounted pergolas today and start your journey toward a more tranquil, luxurious lifestyle.
Secure Your Vision of Outdoor Luxury
Creating a professional-grade extension of your home is a journey that rewards precision and foresight. You now understand the vital importance of UK planning heights and the technical steps required to protect your home's insulation. By implementing expert weatherproofing and flashing, you've ensured that your new architectural addition remains a dry, leak-free sanctuary regardless of the British weather. Mastering how to attach a pergola to a house transforms your patio from a seasonal space into a permanent, year-round lifestyle upgrade.
We've designed our kits to make this high-end transformation as efficient as possible. Our structures feature rust-resistant powder-coated aluminium and come with a 10-year structural warranty, ensuring your investment is protected for the long term. With fast UK nationwide delivery, you can start building your dream outdoor room immediately. Browse our premium wall-mounted aluminium pergola kits and take the first step toward a more tranquil home. Your perfect indoor-outdoor transition is just a few clicks away.
Frequently Asked Questions
Do I need planning permission to attach a pergola to my house in the UK?
Most wall-mounted pergolas fall under Permitted Development rights and don't require formal planning permission. However, you must adhere to specific 2026 regulations; the structure cannot be forward of your home's principal elevation and must not cover more than 50% of your garden area. If your project is within 2 metres of a boundary, the maximum height is strictly capped at 2.5 metres to remain compliant.
Can I attach a pergola to a house with external wall insulation?
Yes, you can securely mount a structure to a house with external insulation by using specialist stand-off fixings. These components bridge the insulation gap to anchor directly into the solid masonry behind. This method prevents the "crushing" of your thermal render and ensures the weight is supported by the building's structural core rather than the delicate outer cladding.
What is the best height to mount a pergola on a house wall?
The ideal height for how to attach a pergola to a house usually sits between 2.3 and 2.5 metres at the ledger beam. This provides generous head clearance while allowing for a subtle pitch to ensure efficient water runoff. You should always check for obstructions like first-floor windows, boiler flues, or decorative brickwork before finalising your mounting position.
Will attaching a pergola to my house cause damp issues?
Structural attachments won't cause damp if you use professional weatherproofing techniques. It's vital to install lead or lead-alternative flashing that bridges the gap between your house wall and the pergola frame. Combined with high-quality exterior silicone sealant, this creates a watertight seal that prevents rainwater from running down the masonry and entering your wall cavity.
Can I install a wall-mounted pergola kit myself?
Our modular aluminium kits are specifically designed for straightforward DIY assembly by two people. You don't need professional builders; basic tools like an SDS drill, spirit level, and torque wrench are sufficient to achieve a high-end finish. The precision engineering of the components ensures that every part fits together logically, making the transformation of your patio a rewarding weekend project.
What kind of bolts should I use to fix a pergola to brickwork?
M12 expansion bolts are the standard choice for secure fixing into solid brickwork. If you're working with older or softer masonry, chemical resin anchors provide a superior bond by distributing the load more evenly within the brick. Always ensure your fixings are tightened to the correct torque, typically 50 to 60 Nm, to prevent overstressing the host wall while maintaining industrial-strength stability.
Is a wall-mounted pergola stronger than a free-standing one?
Wall-mounted structures benefit from the immense structural integrity of your home, which acts as a rock-solid anchor. This connection significantly reduces lateral movement and "sway" during high winds compared to free-standing units. By using your house as a primary support, you create an incredibly stable environment that feels like a permanent architectural extension of your living space.
Do I need a Party Wall agreement for a pergola?
You may need a Party Wall agreement if you're fixing your pergola to a wall shared with a neighbour, such as in a terraced or semi-detached property. Under the Party Wall Act 1996, you should serve a formal notice before drilling into the shared masonry. This transparent approach protects both parties and ensures your project proceeds with the full support of those living next door.


